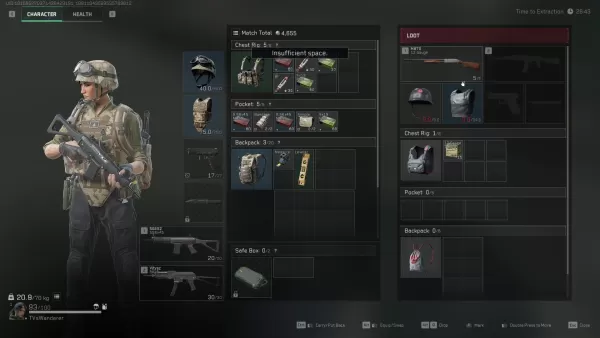
In Delta Force, Operations mode—also known as Hazard Operations or Extraction mode—captures the essence of high-stakes action. Whether you call it Operations or "raiding," the core objective remains consistent: parachute into the map, gather valuable gear, and successfully extract before being eliminated by other players or AI enemies. The unique aspect of this mode is that all your brought-in equipment is at risk; if you perish, you lose everything.
This comprehensive guide delves deeper than mere survival tactics. It explores the mechanics of Operations mode from beginning to end, including pacing your runs, managing your gear, and making strategic decisions to accumulate value over time. For those primarily interested in survival strategies, we have a dedicated blog post on the subject.
Whether you're playing solo or with a squad, understanding the system is crucial for playing smarter, not harder.
What Operations Mode Actually Is
Delta Force's Operations mode is a dynamic PvPvE sandbox where each session presents a unique challenge. You, along with up to two teammates, enter a live map teeming with AI soldiers, lootable resources, and rival teams. Your mission is to collect as much loot as possible and safely extract before being taken down.
Unlike traditional shooter modes, there's no score to pursue. What you successfully extract contributes to your external inventory. Conversely, death means losing everything you carried, except for items secured in your Safe Box. This risk-and-reward dynamic heightens the intensity of Operations mode, even when you're simply grabbing medical supplies and sneaking out.
Loadout Planning and Inventory Control
Success in Operations mode begins before you even enter the map—with strategic loadout planning. Each match incurs an entry fee, making your loadout choices crucial. Essentials like a helmet, armor, chest rig, and backpack are mandatory for deployment. However, your selections beyond these basics will shape your gameplay strategy.

Extraction points are generally fixed, but some maps feature dynamic elements such as elevators or enemy-controlled checkpoints. Plan your exit strategy before venturing deep into the map.
Loot Smarter, Not Harder
Each item in Operations mode has a sell value, but not all are worth the risk. Initially, focus on acquiring healing supplies, attachments, and rare electronics—these are compact, valuable, and easily storable in your Safe Box if necessary.
Heavy weapons and armor may seem appealing, but they can slow you down and consume valuable inventory space. Only carry such items if you're confident in your ability to extract or if you're near an exit with nothing else to lose.
A useful tip for beginners is to steer clear of major loot areas during the early stages. Allow other teams to engage in combat, then scavenge the remnants. If playing solo, focus on looting the map's perimeter and revisit later. You'll often find valuable items left behind after intense team battles.
Picking the Right Operative
Your choice of Operative significantly influences your playstyle in Operations mode. Not all Operatives are suited for stealth or loot-focused gameplay, so choose one that aligns with your objectives.
Luna and Hackclaw excel in intelligence gathering and mobility. Luna can tag enemies and disrupt advances with her shock arrows, while Hackclaw moves silently and executes stealthy takedowns with her knife. Stinger's healing capabilities make him ideal for team play, particularly in support of more aggressive players.
Avoid Operatives with loud or conspicuous abilities unless your strategy involves direct confrontation. Characters like D-Wolf can be entertaining, but they draw too much attention in a mode where staying hidden often yields better outcomes.
Fight When It Matters
In Operations mode, choosing your battles wisely is more critical than emerging victorious from every encounter. While PvP kills can yield gear and XP, they can also delay your progress and attract unwanted attention. Engage only when necessary or strategically advantageous.
During firefights, constantly reposition and aim for quick resolutions. Use abilities to gain an edge—Luna’s detection arrow can reveal hidden foes, and Stinger’s smoke can provide cover for healing or escaping.
Remember, you can always loot defeated players later. If two teams are clashing, consider waiting on the sidelines and letting them weaken each other. Third-partying carries risks, but it's an effective way to acquire gear without having to outgun everyone.
Making the Most of Each Match
Each raid presents an opportunity to accumulate value, hone your skills, or gain new insights. Don't dwell on a poor performance; instead, use it to refine your approach for future runs.
Conserve your credits during losing streaks and adopt a smarter strategy when you're on a winning run. Prioritize upgrading your Safe Box early on, experiment with different Operative configurations, and familiarize yourself with the maps to identify optimal loot routes.
Eventually, your focus will shift from mere survival to optimization, marking the point where Operations mode becomes truly engaging.
Delta Force's Operations mode transcends simple loot-and-run dynamics; it's a game of risk, strategic planning, and intelligent decision-making. Craft your loadout with purpose, loot judiciously, and know when to engage or retreat. And remember, every setback is part of the journey that makes your ultimate success even more rewarding.
For the best gaming experience, consider playing Delta Force on PC using BlueStacks. Enjoy faster load times, precise control, and easier gear management. It's the optimal way to stay competitive as you master the game's intricacies.


