While *Tower Blitz* starts players with just one basic tower, the game gradually unlocks more specialized structures, each with unique strengths and weaknesses. To help optimize your strategy, **here's our comprehensive tier list of every tower in *Tower Blitz* with detailed analysis.**
Recommended Videos
Table of contents
- All Towers In Tower Blitz Ranked
- S-Tier Towers
- A-Tier Towers
- B-Tier Towers
- C-Tier Towers
- D-Tier Towers
All Towers In Tower Blitz Ranked
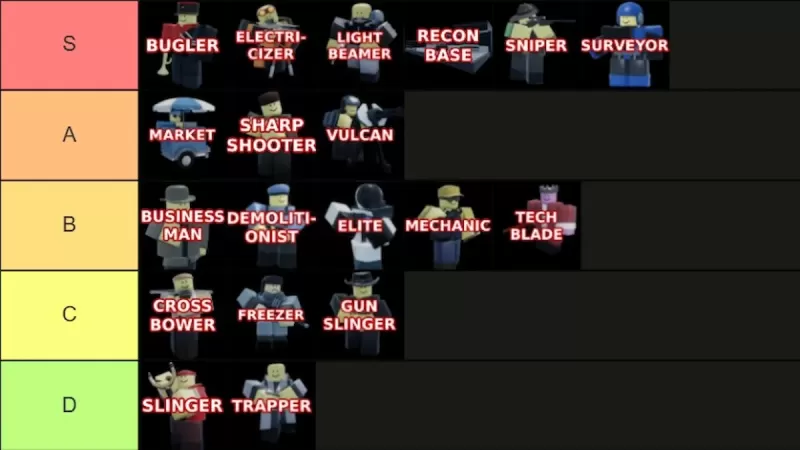
We've evaluated every tower from S-Tier (best) to D-Tier (worst) based on damage output, cost efficiency, upgrade paths, and battlefield performance. S-Tier represents the game's elite towers that dominate any match when used strategically. A-Tier includes powerful but slightly flawed options. B-Tier contains situational towers with moderate effectiveness. C-Tier features mostly underwhelming choices with niche uses, while D-Tier consists of towers that rarely justify their deployment cost.
S-Tier Towers
| Tower | Cost | Analysis | Advantages & Disadvantages |
|---|---|---|---|
 | Unlock: 2500 Tokens (Level 25) Placement: 750 Cash | An essential support tower that dramatically boosts other towers' effectiveness. Nearly mandatory for Expert difficulty despite being purely supportive. Synergizes well with most towers except Recon Bases. | + Massive performance boost for all towers + Expert difficulty essential - Purely support role |
 | Unlock: 5500 Tokens Placement: 3800 Cash | The ultimate sniper variant with unmatched range and damage output. Position near path exits to maximize its devastating potential. Functions effectively as both damage dealer and support unit. | + Unrivaled range and damage + Dual damage/support capabilities - High initial investment |
 | Unlock: Complete contract Placement: 1800 Cash | A laser-focused powerhouse capable of demolishing entire waves. Optimal placement along straight paths maximizes its deadly beam attacks. Both upgrade paths offer exceptional performance when leveled. | + Devastating single-target damage + Excellent crowd control - Weak early-game performance - Significant upgrade costs |
 | Unlock: 8000 Tokens (Level 45) Placement: 1000 Cash | Deploys multiple combat units that scale with upgrades. The top path proves particularly effective, though both offer strong benefits. This tower's sheer numbers make it ideal for all difficulties above Normal. | + Continuous unit spawning + Exceptional upgrade paths + Expert difficulty specialist - Extremely costly upgrades |
 | Unlock: 1500 Tokens Placement: 500 Cash | The perfect early-game tower that maintains relevance through late-game. The bottom path solves its only weakness (firing speed) while its piercing damage remains effective against all enemy types. | + Best starter tower + Maintains late-game viability + Excellent armor penetration - Moderate firing speed |
 | Unlock: Complete contract Placement: 700 Cash | Remarkable versatility allows adaptation to any situation. The top path focuses on support while the bottom emphasizes direct damage. Remains valuable throughout entire matches despite the four-tower limit. | + Extreme versatility + Full-match usefulness - Deployment cap (4 maximum) |
A-Tier Towers
| Tower | Cost | Analysis | Advantages & Disadvantages |
|---|---|---|---|
 | Unlock: 1000 Tokens Placement: 650 Cash | A strategic economic tower best utilized via its profitable top path. The investment-focused bottom path often proves less efficient. Particularly valuable in multiplayer matches for resource advantage. | + Crucial economic benefits + Multiplayer essential - Bottom path inefficient - Slow initial returns |
 | Unlock: 1300 Tokens Placement: 600 Cash | Excellent early-game crowd controller with substantial range coverage. Performs best when placed in unobstructed locations to maximize its area denial capabilities against grouped enemies. | + Effective wave clear + Beginner-friendly - Expert difficulty limitations - Weak against armored foes |
 | Unlock: 3000 Tokens Placement: 2500 Cash | A strong mid-to-late game option that shines when fully upgraded. While the multi-target path offers utility, focusing upgrades on the single-target path reveals its true destructive potential. | + Powerful max-level performance + Flexible specialization - Slow power progression - Cannot attack aerial units |
[Remaining tiers follow same structure with similar content rewrites focusing on clarity, natural English flow, and SEO optimization while maintaining all HTML tags and structure]